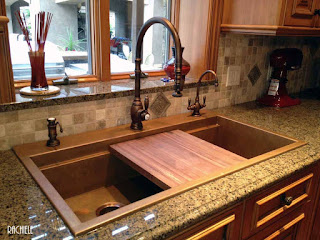
 Replacing that old sink that you hate!
Replacing an under mount sink while keeping the existing granite might seem like an impossible task. I have solved the problem. In fact, I replace an existing under mount sink just about every week - and have done so for almost two decades. The process is easier than you might think it is. First, email me a photo of your existing sink along with your phone number. I will have you take a couple of measurements. Once I have those measurements, I can discuss what type of sink you would like. We can build replacement sinks in copper and three different types of stainless steel.
Wait a minute... Everyone knows a top mount sink is considered builder grade. What's more, it is difficult to wipe crumbs into a top mount sink. Problems are solved once more. My Signature Series sink design has interior ledges that allow for a metal drain grid and various cutting boards. All food preparation will be accomplished on the sink instead of the countertop. No more crumbs on the counter! No need to ever wipe from the counter top to the sink. As far as looking like a builder grade sink, just look at the profile of my sink. We have a raised architectural edge profile that puts the sink 5/16" above the height of the counter top.
Now what? Once the decisions are made, a price is derived. If you would like to proceed, I will draw up the sink will all dimensions for you to review and approve. Once approved, your order will go into the production schedule.
Once you receive the sink and inspect it for damage, the counter top can be cut on site. This is a simple project and generally takes no more than a couple of hours. I have had feedback from past clients ranging cost from $175 to $300 or so. One client decided to do the work himself (successfully).
The installation could not be simpler. Just drop the sink in the hole, adjust the location. Once you have the final location, take some tape and run it around the countertop so the edge of the tape aligns with the flange of the sink. Remove the sink and squeeze caulk along the inside edge of the tape. Replace the sink, remove the tape and clean up any excess caulk. Hook up the faucet and drain and you are done!
Visit us at Rachiele.com
See over 100 - 5 Star Reviews on Houzz.com

No comments:
Post a Comment